Hybrid mobile apps testing in Katalon Studio
Katalon Studio offers limited support to Android hybrid mobile apps only. iOS hybrid apps are currently not supported.
If elements of an Android hybrid app are rendered in a native app, Refer to the Mobile Recorder Tutorials on how to record elements or the Mobile Spy Tutorials on how to capture them.
Mobile Recorder and Spy utilities do not support hybrid apps in WebView. You can use a workaround using Appium and Chrome DevTools.
To learn more about Chrome Devtools and its functions, see also Chrome Devtools.
If your application is Flutter-based, refer to the following documentation for a workaround: Flutter-based application testing with custom SetText keyword in Katalon Studio.
- Capture elements in hybrid Android apps
- Flutter-based application testing with custom SetText keyword in Katalon Studio
[Native render only] Capture elements in hybrid Android apps
- Create a new test case. Go to .
From the main toolbar in the blank test case page, click Record Mobile and select Android Devices.

In the pop-up Mobile Recorder dialog, specify the information in the Configuration section, then click Start to begin recording the application under test (AUT).
 Note:
Note:- If your application begins in a WebView, and you don't want to open the AUT in the
NATIVE_APPcontext, go to to setautoWebviewtotruein Desired capabilities. - With this setting, the AUT automatically enters the
WEBVIEWcontext on session start. Skip Step 4,5,6 and move to Step 7 to continue to automate your hybrid app.
- If your application begins in a WebView, and you don't want to open the AUT in the
By default, the Record Utility starts the AUT in the
NATIVE_APPcontext. Set to theWEBVIEWcontext by using theswitchToWebViewmobile keyword. More information here: [Mobile]switchToWebView.In the main toolbar, click . A new command line appears, then manually add the
switchToWebviewmobile keyword.//to set context to WebView
Mobile.switchToWebView()
Click Save Script. An open dialog asks you to save captured objects into the Object Repository of Katalon Studio. Click OK to save recorded actions and objects.
In the new test case saved from step 5, do as follows:
- Switch to the Script tab.
- Remove command line
Close Application. - Run the test script.

Next, open Chrome browser and navigate to chrome://inspect/#devices. The chrome://inspect page displays:
- The name of your Android testing device.
- The version of Chrome that's running on the device, with the version number in parentheses.
- A list of debug-enabled WebViews on your device. After step 9, you should see the URL of the testing Android application here.
Click Inspect to open a Chrome Devtools instance. Use Chrome Devtools to inspect WebView elements.


Return to Katalon Studio. Create and automate objects in your test with inspected elements from Step 7. To learn more about creating test objects in Webview, you can refer to this document Web Test Object.
In case you are defining test objects programmatically, you can use the following sample code in the script tab of your test:
// this is unnecessary if your AUT automatically enters the WEBVIEW context on session start.
Mobile.switchToWebView()
// to implement Mobile Driver Factory
DriverFactory.changeWebDriver(MobileDriverFactory.getDriver())
// to create a new test object named cdmDetails
TestObject cdmDetails = new TestObject()
// to add the object's property inspected from step 10
cdmDetails.addProperty("id", ConditionType.EQUALS, "119")
WebUI.setText(cdmDetails, "123")
If you wish to stop automating in the
WEBVIEWcontext and back to automating the native portion of the app, use theswitchToNativemobile keyword. More information here: [Mobile]switchToNative mobile keyword.// to switch back to the native mode.
Mobile.switchToNative()
[Webview] Capture elements in hybrid Android apps in Katalon Studio
Katalon Mobile Recorder/Spy utility can detect elements in hybrid app rendered as native app, but cannot as Webview. This tutorial provides a solution to capture Android hybrid mobile elements in WebView with Appium and Chrome Devtools. You can learn more about Android WebView functionalities from the Android developer documentation here: WebView.
Enable Webview debugging in your Android app. To enable this, set the
setWebContentsDebuggingEnabledproperty on theandroid.webkit.WebViewelement totrue.For more information about configuring WebView for debugging, refer to the following Chrome developer documentation here: Remote debugging WebViews.
Install ChromeDriver for Appium. By default, Appium installation includes the latest version of ChromeDriver. However, if your testing device are running different Chrome browser version, you should download the compatible version with Chrome on your testing devices from the Chromium website: ChromeDriver.
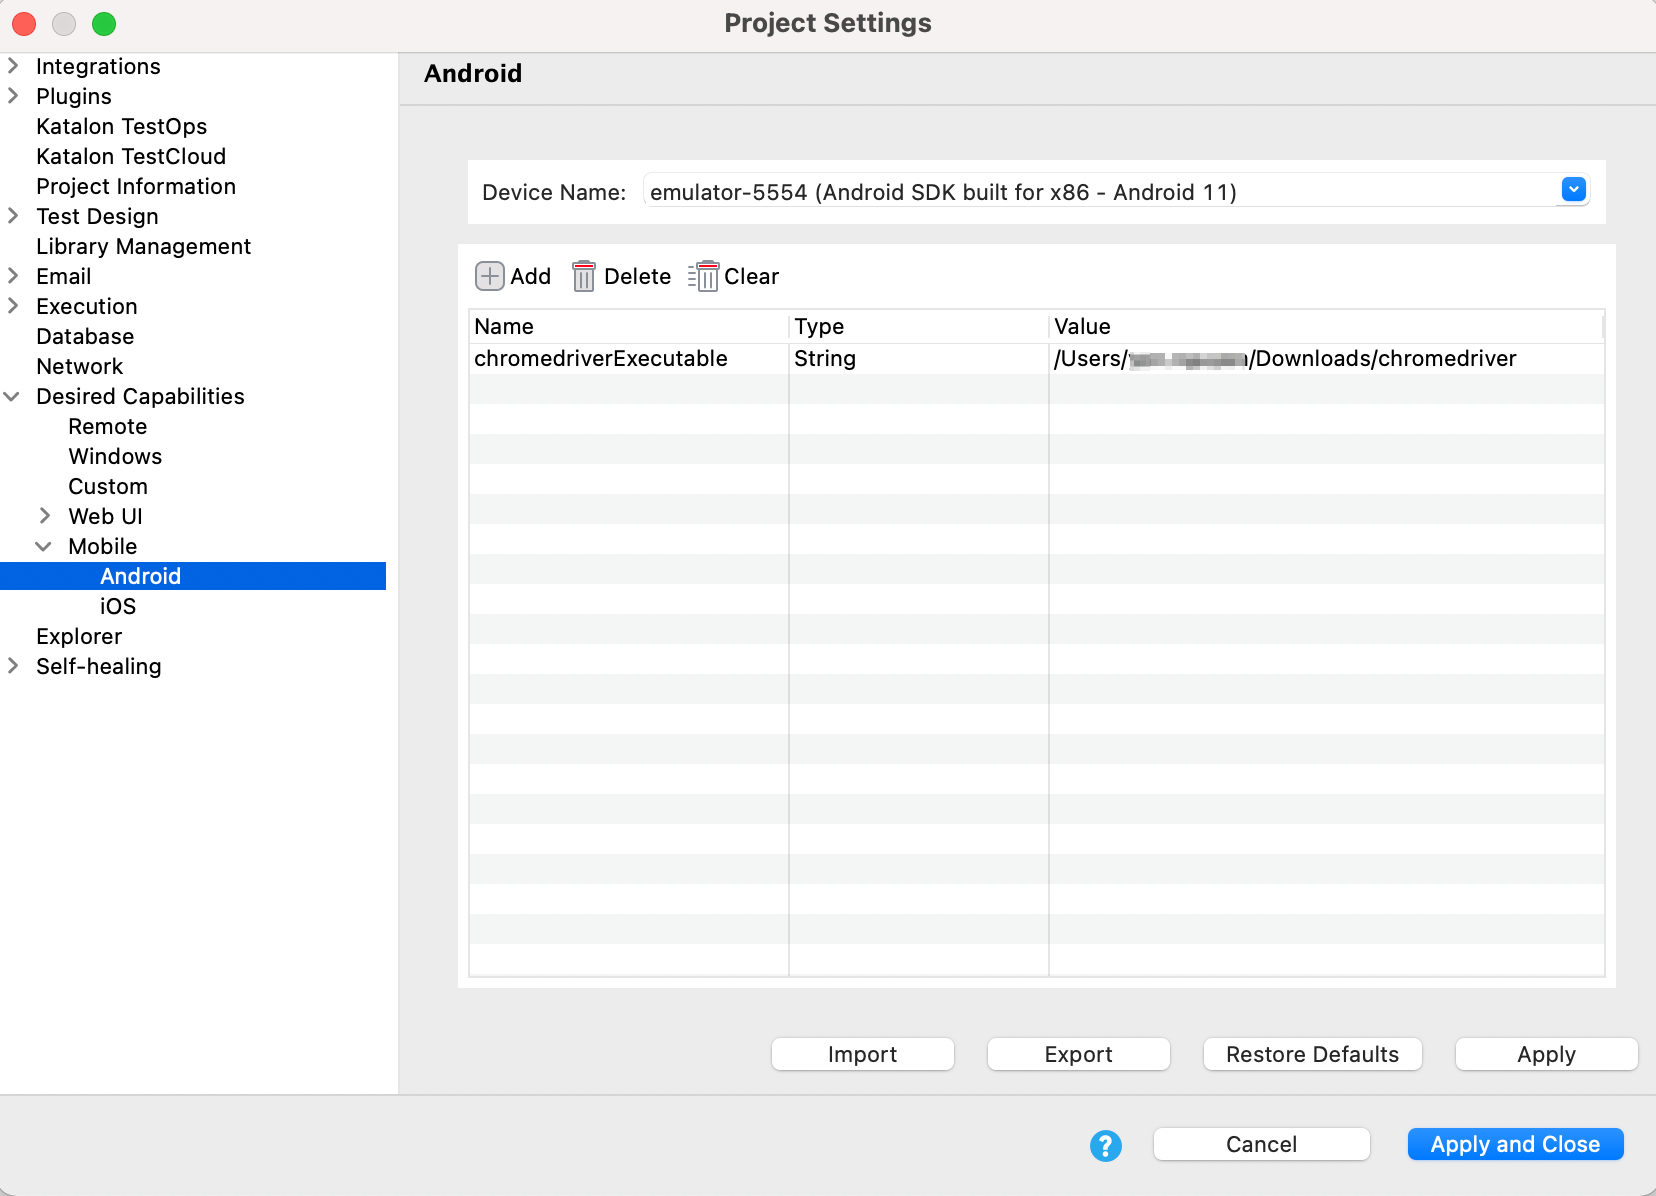
Specify the ChromeDriver version in the session. Go to and add this property:
Name Type Value chromedriverExecutable(*) String <path-to-your-chromedriver>(**)(*)
chromedriverExecutable: Support specifying ChromeDriver version in session capabilities.(**)
<path-to-your-chromedriver>: full path to the ChromeDriver executable downloaded from Step 1. For example:/Users/katalon.team/Downloads/chromedriver.For example:

Follow similar instructions in [Native render only] Capture elements in hybrid Android apps.
Take note of the additional instructions for Webview record and capture in Step 3.